The air grows crisp, the leaves turn, and the spirit of Halloween begins to stir. For many, this season brings to mind one iconic figure above all: Jack Skellington, the Pumpkin King himself. His hauntingly charming visage, a perfect fusion of spooky and sweet, is an ideal subject for your Halloween decor. But to truly bring his ghoulish grin and expressive eyes to life on a pumpkin, you need the right arsenal. This guide cuts through the clutter, detailing the essential tools & supplies for Jack Skellington pumpkins, ensuring your creation is not just a decoration, but a masterpiece worthy of Halloween Town.
At a Glance: Your Jack Skellington Pumpkin Essentials
- Two Paths, One Goal: Decide between carving for classic illuminated designs or painting for vibrant, long-lasting displays.
- The Right Pumpkin Matters: Opt for white pumpkins to best mimic Jack’s skeletal pallor, though any pumpkin works.
- Stencil is Key: A high-quality Jack Skellington stencil (whether simple face or detailed scene) is your blueprint.
- Carving Must-Haves: Beyond basic kits, consider detail tools like linoleum cutters and craft knives for precision.
- Painting Power: Acrylic or spray paints, fine-tip brushes, and paint pens are your friends for no-carve designs.
- Illumination: LEDs are safest, with blue lights enhancing carved details and glow-in-the-dark paint adding an extra dimension.
- Safety First: Always prioritize safety, especially when using sharp tools or working with paints.
Why Jack? The Pumpkin King's Enduring Allure
Before we dive into the toolbox, let's appreciate why Jack Skellington reigns supreme in the realm of pumpkin artistry. As the protagonist of Tim Burton and Disney’s "The Nightmare Before Christmas," Jack, also known as the Pumpkin King, embodies the very essence of Halloween. His own head is, after all, a carved pumpkin! From his iconic stitched mouth to his expressive eyes, Jack's design offers a fantastic canvas for creativity. Whether you're aiming for a wide, welcoming smile or a more menacing, jagged grin, his character provides endless inspiration for captivating Halloween decorations.
His story, his friends (Zero, Sally), and even his nemeses (Oogie Boogie) offer a rich tapestry of imagery that translates beautifully onto a pumpkin. It’s not just a pumpkin; it’s a tribute to a beloved character and a celebration of Halloween itself.
Decisions, Decisions: Carving or Painting Your Nightmare?
The first essential "tool" is a decision: will you carve your Jack Skellington pumpkin, or will you paint it? Each method offers distinct advantages and requires a slightly different set of supplies and skills. Understanding these differences will help you choose the best approach for your vision and experience level.
The Classic Approach: Pumpkin Carving
Carving is the traditional route, creating a glowing, shadowy effect that’s quintessential Halloween. It involves cutting through the pumpkin flesh to allow light to shine through, mimicking Jack's very nature as a living jack-o-lantern.
- Pros: Authentic Halloween feel, offers dramatic illumination, very satisfying to see light shine through your work.
- Cons: Messy, requires sharp tools (safety concern), carved pumpkins have a shorter lifespan.
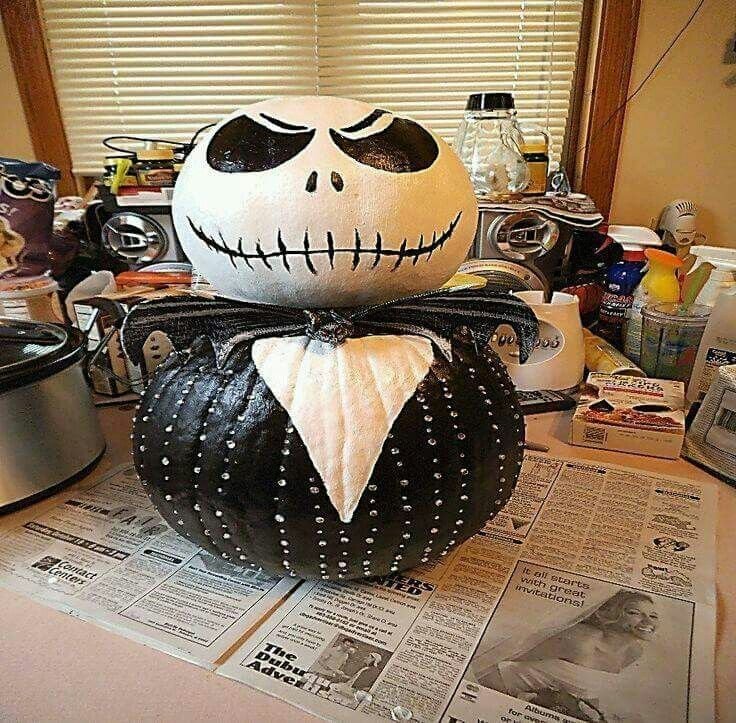
The Modern Twist: Pumpkin Painting (No-Carve)
Painting your Jack Skellington pumpkin offers a versatile and often less messy alternative. It allows for vibrant colors, intricate details that might be too fragile to carve, and significantly extends the life of your pumpkin. Plus, it's a fantastic option for families with younger children who want to participate safely.
- Pros: Less mess, safer (no sharp tools needed), pumpkins last much longer, allows for more detailed and colorful designs, great for all ages.
- Cons: No internal illumination effect (unless combined with external lighting), can lack the traditional "glowing" pumpkin aesthetic.
Many of the fundamental elements, like choosing your pumpkin and using a stencil, bridge both methods. Let's break down the specific tools and supplies you'll need, starting with the base layer: your pumpkin.
The Canvas: Choosing Your Perfect Pumpkin
No matter if you're carving or painting, your journey begins with selecting the right pumpkin. Think of it as Jack Skellington's head itself—the foundation for his iconic expression.
Size and Shape
Consider the design you have in mind. A complex scene featuring Jack on Spiral Hill, or perhaps with Sally, will require a larger, flatter surface. For just Jack's face, a medium-sized, round pumpkin works perfectly. Remember, a truly good pumpkin should:
- Be firm: Avoid soft spots, bruises, or mold.
- Have a sturdy stem: A green, healthy stem often indicates a fresher pumpkin.
- Have a relatively smooth surface: Bumps and ridges can make stenciling and carving/painting challenging.
The White Pumpkin Advantage
To truly mimic Jack Skellington's ghostly pallor, white pumpkins are highly recommended. Their pale surface provides a natural backdrop for his black features, reducing the need for multiple coats of white paint if you're going the no-carve route. If you're carving, the contrast of the glowing interior against the white exterior is particularly striking. That said, a traditional orange pumpkin makes a fantastic Jack as well; it just leans into the "jack-o'-lantern" aspect more.
Your Blueprint: Jack Skellington Stencils & Templates
This is where Jack's personality truly comes to life. A well-chosen stencil is your absolute best friend, guiding your hand whether you're carving precise lines or painting intricate details. There are dozens of Jack Skellington pumpkin stencil ideas, catering to every skill level and desired look.
Where to Find Your Stencil
You can find stencils online for free, purchase them, or even design your own. Popular options include:
- Just Faces: Featuring Jack's iconic stitched mouth, eyes, and nose, with expressions ranging from wide smiles to scary faces, angry eyes, or jagged mouths. These are great for beginners.
- More Detailed Designs: Think Jack's face framed by bats, headless Jack, upper body depictions, Jack on Spiral Hill, with a spider snowflake, head and shoulders, or holding a carved pumpkin head. These require a bit more patience and precision.
- Character Combinations: Jack and Sally together (on Spiral Hill, with a heart, or with the moon), or Jack with other characters like Lock, Shock, Barrel. These are fantastic for a narrative display.
Remember, any carving stencil can also serve as a template for painted pumpkins. Simply print your desired design and you’re ready to transfer!
The Carving Arsenal: Tools for the Traditionalist
If you're opting for the classic carved Jack, you'll need more than just a kitchen knife. Precision and safety are paramount.
Transferring Your Design
Once you have your stencil, getting it onto the pumpkin accurately is the first critical step.
- Printed Stencils: Tape your printed stencil securely to the pumpkin, ensuring it's as flat as possible. Use a plastic poking tool (often included in basic carving kits) or a thumbtack to poke small holes along the lines of the design. Space the holes closely, about 1/8 to 1/4 inch apart. Once the stencil is removed, you'll have a dotted outline to follow.
- Freehand / Water-Based Marker: If you're confident in your drawing skills, you can copy the stencil by hand directly onto the pumpkin using a water-based marker. This allows for quick adjustments and wipes off easily if you make a mistake. A regular ballpoint pen can also be used for tracing once the stencil is taped on.
Essential Carving Tools
Forget the flimsy, often ineffective tools found in cheap kits. For a truly professional-looking Jack, invest in quality.
- Pumpkin Saw/Serrated Knives: For cutting the top lid or larger sections. Look for saws with fine teeth for cleaner cuts.
- Scooping Tools: A sturdy metal scoop with a serrated edge makes short work of scraping out the pumpkin guts and thinning the walls, which is crucial for light to shine through and for easier carving.
- Detail Carving Tools: This is where the magic happens for Jack's intricate features.
- Craft Knives/X-Acto Knives: Essential for fine lines, sharp corners, and small details like Jack's stitched mouth or the pupils of his eyes. Always use a fresh, sharp blade.
- Linoleum Cutter Set: This is a secret weapon for advanced carvers. These small, chisel-like tools are fantastic for scraping away the outer layer of pumpkin skin without cutting all the way through. This technique creates different depths and translucent effects, adding incredible dimension to Jack's face (think shading around his eyes or a subtle texture to his stitches). They come with various blade shapes (V-shaped, U-shaped) for different effects.
Safety Considerations for Carving
Sharp tools mean safety can't be an afterthought.
- Always cut away from yourself: This seems obvious, but it's easy to get absorbed in the detail.
- Wear gloves: Thick work gloves can protect your hands, especially if you're working with larger, slippery pumpkins.
- Work on a stable surface: A cutting board or mat will protect your table and provide a steady base.
- Adult supervision: Absolutely essential for children.
The Painter's Palette: Supplies for a No-Carve Masterpiece
If carving isn't your speed, or you want a longer-lasting decoration, painting is a fantastic alternative. Here's what you'll need to transform your pumpkin into a vibrant Jack Skellington.
The Canvas: Choosing Your Pumpkin (Revisited)
As with carving, select a firm, blemish-free pumpkin. White pumpkins are still excellent choices for Jack, providing a neutral base. For smaller, simpler Jack Skellington faces, small pumpkins are an inexpensive craft idea, perfect for kids' Halloween parties.
Bringing Jack to Life: Paints & Brushes
- Acrylic Craft Paints: These are widely available, relatively inexpensive, and dry quickly. Black and white are your primary colors for Jack, but you might want a touch of yellow for Zero’s nose or even some gray for shading.
- Exterior-Grade Spray Paint: For larger pumpkins or a very smooth, uniform base coat (like a solid white or black). Always use in a well-ventilated area and follow manufacturer instructions.
- Glow-in-the-Dark Paint: A popular option for adding dimension and an extra spooky touch, especially to Jack's eyes or stitches. Apply this over your base colors for the best effect.
- Brushes: You'll need a variety:
- Flat Brushes: For applying base coats of white or black.
- Round Brushes (Small to Medium): For painting Jack's eyes, nose, and larger mouth sections.
- Fine-Tip Brushes (Detail Brushes): Crucial for those signature stitches on Jack's mouth and any other delicate lines.
Detailing & Outlining
- Fine-Tip Paint Pens or Markers: For crisp, clean lines, especially for the mouth stitches and eyes. Black permanent markers can work well for outlines if you're not using paint.
- Pencil/Water-Based Marker: For lightly sketching your design onto the pumpkin before you commit with paint. This allows for adjustments without major repainting.
Protection & Finishing
- Clear Sealant or Varnish: Once your painted Jack is dry, a coat of clear sealant (spray or brush-on) will protect your artwork from the elements, prevent chipping, and give it a polished finish. Look for outdoor-rated options if your pumpkin will be displayed outside.
Beyond the Basics: Enhancing Your Jack Skellington Pumpkin
Ready to take your Jack Skellington pumpkin to the next level? A few extra supplies can add flair and personality that truly make your creation stand out.
Lighting Up the Nightmare
For carved pumpkins, traditional candles are a fire hazard. Opt for safer, more effective alternatives:
- Battery-Operated LED Candles: These provide a warm, flickering glow similar to real candles without any fire risk.
- Mini LED String Lights: For a brighter, more even illumination, particularly good for larger carved designs.
- Blue Lights: A specific recommendation from the pros! Using a blue LED light bulb or string lights inside a carved pumpkin can effectively illuminate the design, giving Jack a spooky, ethereal glow that perfectly suits his Halloween Town origins.
- Glow-in-the-Dark Paint (for painted pumpkins): As mentioned, this can add an amazing, subtle luminescence to details like Jack's eyes or Zero’s pumpkin nose, making your no-carve creation shine after dark.
Accessorizing Jack & Friends
Why stop at just a face? Embrace the world of "The Nightmare Before Christmas" by adding elements beyond paint or carving.
- Fabric and Felt: Give Jack a fabric bow tie, or create Sally's patchwork dress on a neighboring pumpkin.
- Wire and Craft Foam: Fashion Zero's iconic glowing orange pumpkin nose from craft foam and attach it with wire. You could even create ghostly ears!
- Hot Glue Gun: Your best friend for attaching embellishments securely.
- Pipe Cleaners or Twine: For subtle details or to create hair for other characters.
- Googly Eyes: For a whimsical, kid-friendly take on Lock, Shock, or Barrel if you're crafting multiple pumpkins.
Think about how you can incorporate other elements from Halloween Town. Could you add a small bat cutout next to Jack? Or a spider snowflake design with glitter for a touch of eerie elegance? These small touches can transform a simple pumpkin into a narrative piece.
Safety First: A Friendly Reminder for All Pumpkin Artists
No matter your chosen method, safety should always be a top priority.
- Carving Safety: Always supervise children. Keep fingers away from blades. Cut away from your body. Dispose of sharp tools safely.
- Painting Safety: Work in a well-ventilated area, especially if using spray paints or strong-smelling sealants. Protect your work surface with newspaper or a drop cloth. Wash hands thoroughly after painting.
- Illumination Safety: Always opt for battery-operated lights over open flames to prevent fire hazards.
Troubleshooting & Tips from the Pumpkin Patch Pros
Even with the best tools, you might encounter a snag or two. Here are some quick tips to keep your Jack Skellington project on track:
- "My stencil won't stick!" For carved pumpkins, a light mist of spray adhesive (removable type) on the back of your stencil can help it adhere better to a bumpy pumpkin surface before poking holes. Alternatively, use plenty of masking tape to secure it.
- "My paint is streaky!" For painted pumpkins, ensure your pumpkin is clean and dry before starting. Apply thin, even coats of paint, allowing each layer to dry completely before adding the next. Multiple thin coats are always better than one thick, gloppy coat.
- "How do I make it last?"
- Carved Pumpkins: To extend the life of a carved pumpkin, spray the cut edges daily with a bleach-water solution (1 part bleach to 10 parts water) or petroleum jelly to prevent mold and dehydration. Store it in a cool, shaded area or even refrigerate it overnight.
- Painted Pumpkins: Once fully dry and sealed, painted pumpkins will last as long as an uncarved pumpkin, typically several weeks or even months if kept indoors in a cool, dry place.
- "What if I mess up a carved detail?" For minor mistakes, you can sometimes use a small piece of pumpkin rind (from the cut-out top) and a toothpick to "patch" small errors. It won't be invisible, but it can salvage a major design flaw.
- Kids' Halloween Parties: Painting small pumpkins is a fantastic, inexpensive craft idea for kids. Provide simple Jack Skellington stencils (or let them freehand!), black and white paint, and plenty of brushes. It’s safe, fun, and everyone gets a unique take-home decoration.
Your Jack Skellington Journey Starts Here
Creating a Jack Skellington pumpkin is more than just a craft; it's a cherished Halloween tradition. With the right essential tools & supplies for Jack Skellington pumpkins, coupled with a dash of patience and creativity, you're well on your way to crafting a spectacular tribute to the Pumpkin King.
Whether you choose the glowing drama of a carved jack-o'-lantern or the vibrant longevity of a painted masterpiece, remember that the most important tool is your imagination. Gather your supplies, select your pumpkin, and let the spirit of Halloween Town inspire your artistic endeavors.
For even more ideas and techniques to perfect your Halloween display, explore our comprehensive guide to Jack Skellington pumpkins. Happy haunting, and happy carving (or painting)!