When Halloween rolls around, few characters capture the playful spookiness quite like Jack Skellington, the Pumpkin King himself. His iconic, round-headed visage makes him a natural fit for pumpkin decorating. But let's be honest: traditional carving can be a messy, time-consuming affair, complete with slippery tools and pumpkin guts everywhere. If you're looking for a cleaner, safer, and equally striking way to bring Jack's charm to your doorstep, no-carve Jack Skellington pumpkin designs are your ultimate Halloween hack. We're talking mess-free, budget-friendly, and perfectly suited for all ages, letting you achieve that eerie elegance without ever picking up a carving knife.
At a Glance: Your No-Carve Jack Skellington Success Kit
- Mess-Free Magic: Skip the carving tools and pumpkin guts; painting is cleaner and safer.
- Budget-Friendly: Often requires fewer specialized tools than carving, making it easier on your wallet.
- All Ages Welcome: A fantastic activity for kids and adults alike, no sharp objects required.
- Foam is Your Friend: Craft pumpkins provide a smooth, durable canvas that lasts year after year.
- Simple Supplies: White paint, black marker, and your pumpkin are the essentials.
- Iconic Look: Easily recreate Jack's distinct eyes, nose, and stitched mouth with a marker.
- Durability: Painted pumpkins (especially foam) outlast carved ones, staying fresh throughout the season.
Why Go No-Carve for the Pumpkin King?
Think about the classic Jack Skellington look: a smooth, bone-white skull with stark, black features. It's a design that practically begs for a paintbrush and marker, not a jagged blade. Beyond the aesthetic match, choosing a no-carve approach offers a heap of practical benefits.
First off, it’s remarkably mess-free. No more scooping stringy pulp, no dealing with slippery rinds, and certainly no sticky seeds clinging to every surface. This alone is a huge win for anyone who’s ever faced the post-carving cleanup.
Secondly, it's incredibly safe and accessible. Without the need for sharp tools, painting pumpkins becomes an activity for everyone. Little hands can join in the fun, contributing to the family's Halloween decor without the risks associated with carving. It’s also a much more forgiving medium; a mistake with a marker is easily painted over or wiped away, unlike a slip of a carving tool.
Finally, no-carve designs, particularly when done on craft pumpkins, offer unbeatable longevity. A carved pumpkin begins to rot almost immediately, lasting only a few days before becoming a mushy, moldy mess. A painted pumpkin, especially a foam one, can be stored and reused year after year, becoming a cherished part of your Halloween traditions. This durability makes them a fantastic investment for your seasonal decor, as you can always find new inspiration for your next Jack Skellington pumpkin design.
Gathering Your Tools: The Jack Skellington Artist's Kit
Before you channel your inner Pumpkin King and start creating, you’ll want to gather a few essential supplies. The beauty of no-carve is that the list is short, sweet, and readily available at most craft or dollar stores.
- Your Chosen Pumpkin: Whether it's a fresh pumpkin or a craft foam pumpkin, this is your canvas.
- White Acrylic Paint: This will be your base coat. Opt for a good quality craft paint that offers decent coverage. If you're using a real pumpkin, a multi-surface outdoor paint might be a good idea for longevity, especially if it’s displayed outside.
- Black Permanent Marker (or Black Paint & Fine Brush): A thick, chisel-tip black marker is often the easiest for drawing Jack's features. If you prefer the control of a brush, use black acrylic paint and a fine-tipped artist's brush.
- Paint Brushes: A medium-sized brush for applying the white base coat and, if you're going the paint route for features, a very fine brush for details.
- Paper Towels or Rags: Essential for cleanup and wiping brushes.
- Palette (Optional): A paper plate or an old plastic lid works perfectly for your paint.
- Newspaper or Drop Cloth: Protect your work surface from paint drips.
- Water-Based Marker (Optional but Recommended): For sketching out features before committing with a permanent marker. This allows for easy corrections with a damp cloth.
Choosing Your Canvas: Real vs. Craft Pumpkins
The type of pumpkin you select will influence both the process and the lifespan of your Jack Skellington masterpiece. Both real and craft pumpkins have their advantages for no-carve designs.
Real Pumpkins: The Traditional, Temporary Choice
- Pros: Authentic feel, natural texture, readily available in the fall.
- Cons: Limited lifespan (will eventually rot), can be uneven or bumpy, might require more paint coats due to natural variations.
- Tip: Look for pumpkins with a smooth, even surface. White pumpkins are an excellent choice here, as they provide a natural head start on Jack's pallor, reducing the number of white paint coats you'll need. This is a great way to explore the full spectrum of Jack Skellington pumpkin styles.
Craft (Foam) Pumpkins: The Durable, Reusable Star
- Pros:
- Durability: These last forever! You can store and reuse them year after year, saving time and money in the long run.
- Smooth Surface: Foam pumpkins offer an ideal, consistent surface for painting, often requiring fewer coats for a pristine finish.
- Lightweight: Easy to handle and move around once decorated.
- No Rotting: Perfect for displaying indoors or in areas where a real pumpkin might attract pests.
- Cons: Can be more expensive upfront than a single real pumpkin (though cheaper over time), less "natural" feel.
- Tip: Many craft stores sell white foam pumpkins, which are a major time-saver as they come pre-primed in Jack’s signature color. This means you can often skip the first few painting steps entirely!
For a truly mess-free and long-lasting Jack Skellington, a craft foam pumpkin, especially a white one, is hands down the top recommendation.
The Master Plan: Step-by-Step No-Carve Jack Skellington
Now for the fun part! This step-by-step guide will walk you through transforming your chosen pumpkin into the beloved Pumpkin King.
Step 1: The Pristine Canvas – Painting Your Pumpkin White
Jack Skellington's skeletal head is famously white, so this is your foundational step.
- Prepare Your Workspace: Lay down newspaper or a drop cloth. Have your paint, brushes, and a cup of water ready.
- Clean Your Pumpkin: If using a real pumpkin, wash it thoroughly and dry completely to remove any dirt or residue. For foam pumpkins, a quick wipe down is usually sufficient.
- Apply the First Coat of White Paint: Using your medium-sized brush, apply an even coat of white acrylic paint to the entire pumpkin. Don't worry if it's not perfectly opaque yet; we'll build up the color. Make sure to cover the stem area as well, or you can paint it black later for contrast if you prefer.
- Quick Tip: If you have a white foam pumpkin, you might be able to skip this step entirely or just apply one light coat for a super smooth finish.
- Dry Time (First Coat): Allow the first coat to dry for approximately 30 minutes. It's important to be patient here; applying a second coat too soon can cause streaking or lift the first layer.
- Apply the Second Coat: Once the first coat is dry to the touch, apply a second, even layer of white paint. This will ensure your pumpkin has that crisp, opaque white finish characteristic of Jack.
- Final Dry Time: Let the second coat dry completely. This typically takes around 60 minutes, but can vary based on humidity and paint thickness. The surface should feel totally dry and not tacky at all. Do not proceed to the next step until the paint is bone-dry. This is crucial for clean lines when drawing his face.
Step 2: Defining Jack's Signature Look – Drawing the Features
This is where Jack truly comes to life! We'll use a black permanent marker (or black paint and a fine brush) to add his iconic face. Remember, you can lightly sketch with a water-based marker first for practice.
- Sketching (Optional but Recommended): Grab your water-based marker. Lightly sketch the outline of Jack's eyes, nostrils, and mouth onto the dry white pumpkin. This allows you to adjust placement and symmetry before making it permanent. If you make a mistake, a damp paper towel can easily erase it.
- Drawing the Eyes:
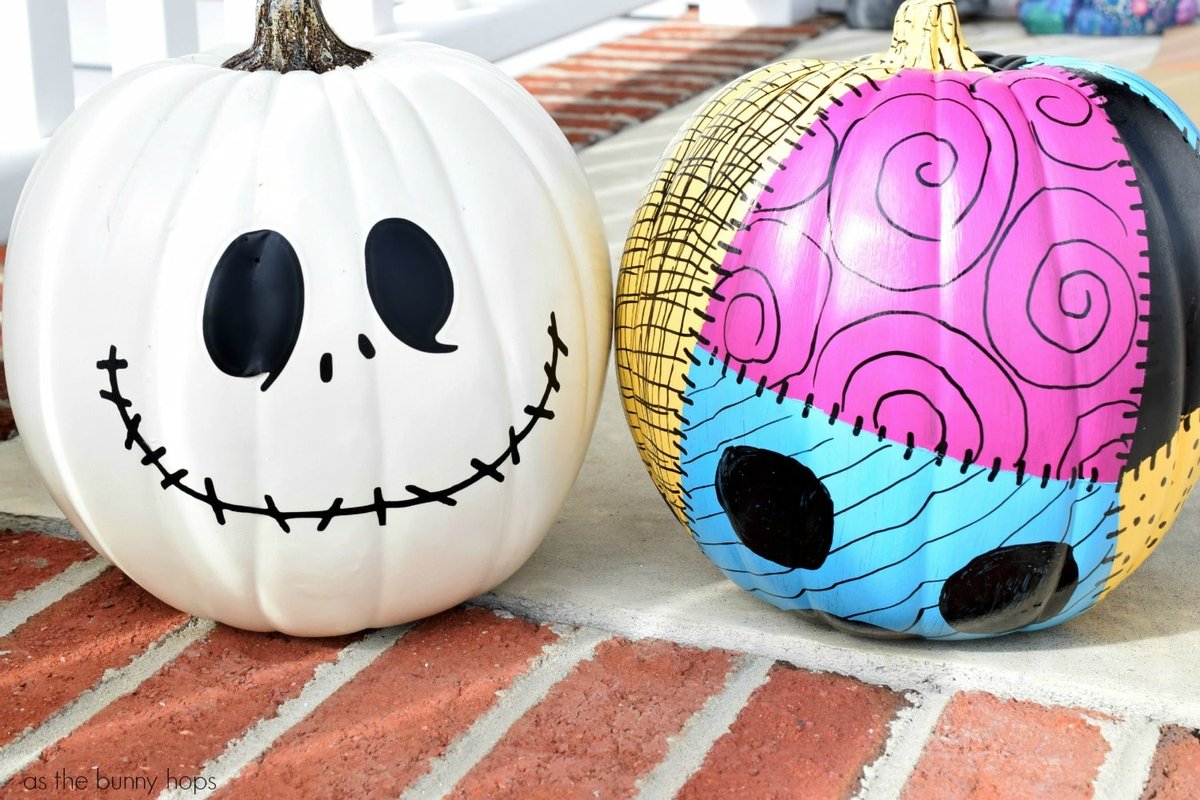
- Draw two oval shapes for the eyes. Jack's eyes are typically slightly slanted, giving him his signature quizzical or intense expression. They shouldn't be perfectly round; think of them as elongated ovals, wider towards the center of his face and tapering slightly outwards.
- Fill in the oval shapes completely with your black marker or paint. Ensure they are dark and solid.
- Creating the Nostrils:
- Below and between the eyes, draw two smaller, more slanted oval shapes for his nostrils. These are often more acutely angled than his eyes, almost like tiny upside-down V's with rounded bottoms.
- Fill these in completely with black.
- Crafting the Mouth: This is perhaps Jack's most distinctive feature.
- Start by drawing a relatively straight line across the middle of the pumpkin where the mouth should be. This line should curve gently upwards at each end, giving Jack his characteristic "smile." The curve isn't exaggerated; it's a subtle, almost mischievous upturn.
- Add Definition: Make the line thicker in the middle, filling in a bit more black. This adds depth and visual weight to his mouth, making it stand out more. It shouldn't be a uniform thin line.
- The Stitch Lines: This is the critical detail! From the main mouth line, draw short, thin vertical stitch lines extending outwards, both above and below the main horizontal line. These are evenly spaced and give the impression that his mouth has been "sewn" on. Extend them a little bit beyond the ends of the upward-curving mouth line.
Step 3: The Finishing Touches and Display
Once Jack's face is complete, all that's left is to admire your work!
- Final Dry Time: Allow all the black marker or paint to dry completely. This usually doesn't take as long as the base coat, but it's important to avoid smudging.
- Sealant (Optional for Real Pumpkins): If you've used a real pumpkin and plan to display it outdoors, a clear acrylic sealant spray can help protect the paint from the elements and extend its lifespan a little further.
- Display with Pride: Place your no-carve Jack Skellington pumpkin in your chosen spot. He looks fantastic as a standalone piece, or you can group him with other Halloween decor. Consider adding a small LED tealight behind the pumpkin (not inside, as it's not carved) to cast interesting shadows if you're displaying it against a wall, though traditional illumination isn't needed for painted designs. For even more inspiration, check out the full range of Jack Skellington pumpkin ideas.
Troubleshooting Common "Pumpkin Problems"
Even the simplest projects can hit a snag. Here are quick fixes for common issues you might encounter:
- Streaky White Paint: This usually means you didn't let the first coat dry long enough, or your paint was too thin. Allow each coat ample drying time, and consider adding a third thin coat if necessary.
- Wobbly Black Lines: Don't panic! If using a water-based marker for sketching, simply wipe it away with a damp cloth and try again. If you've already committed with permanent marker or paint, you have a few options:
- Patch Up: Carefully use a small brush and white paint to "erase" small mistakes. Let it dry completely, then redraw.
- Embrace Imperfection: Sometimes, a slightly imperfect line adds to the charm!
- Paint Not Sticking to Real Pumpkin: Ensure your pumpkin is thoroughly clean and dry before painting. Any residue or moisture will prevent paint adhesion. A light sanding (with very fine grit sandpaper) can also help give the paint something to grip, but isn't usually necessary.
Beyond the Basics: Advanced No-Carve Flair
While a classic Jack Skellington is always a winner, there's plenty of room to get creative with your no-carve designs.
- A "Nightmare Before Christmas" Scene: Create a series of pumpkins! Paint a white pumpkin as Jack, then paint an orange pumpkin as Sally with her stitched features, or a smaller white pumpkin as Zero the ghost dog. You can even paint a green pumpkin with Oogie Boogie's burlap texture.
- Textural Elements: Instead of just painting, consider adding 3D elements. For example, you could glue on black yarn for the stitches, or use puffy paint to give the features a raised texture.
- Glitter Glam: A thin coat of iridescent glitter spray over the white pumpkin, once dry, can add a subtle, magical shimmer, perfect for the Pumpkin King's star turn.
- Expression Variations: Jack isn't always smiling! Experiment with different mouth shapes and eye slants to give him a surprised, quizzical, or even slightly menacing expression.
- Hat and Bowtie: For the truly dedicated, you can craft a miniature black bat bowtie and a tall, striped top hat from felt or craft foam and attach them to the top of your pumpkin. This elevates the design to a new level of cosplay. These small additions can make your pumpkin stand out among other Jack Skellington pumpkin projects.
Maintaining Your Masterpiece
If you've opted for a craft foam pumpkin, maintenance is a breeze. Simply store it in a cool, dry place wrapped in tissue paper or bubble wrap to prevent scuffs or dust accumulation. It'll be ready to star in next year's decor!
For real pumpkins, even painted ones, time is the enemy. While paint protects the skin somewhat, the pumpkin will eventually begin to soften and rot.
- Display Location: Keep it in a cool, dry spot. Avoid direct sunlight or extreme temperatures.
- Cleaning: If it gets dusty, gently wipe it with a dry, soft cloth. Avoid harsh cleaners or excessive moisture.
- Check for Soft Spots: Periodically inspect your pumpkin. Once soft spots appear, it’s time to respectfully dispose of it.
Frequently Asked Questions About No-Carve Jack Skellington Pumpkins
Q: Can I use spray paint instead of acrylic paint for the white base?
A: Yes, you can! Spray paint can offer very smooth, even coverage, especially on craft foam pumpkins. Ensure you use a paint specifically designed for your pumpkin material (e.g., "all-surface" spray paint). Always spray in a well-ventilated area and follow the manufacturer's instructions for drying times and recoating.
Q: How long does a no-carve real pumpkin last compared to a carved one?
A: A no-carve real pumpkin will last significantly longer than a carved one, often several weeks to a month or more, depending on climate and conditions. Carving breaks the skin, exposing the flesh to air and bacteria, accelerating decay. A painted pumpkin's skin remains intact, providing a protective barrier.
Q: Is it safe to put a candle inside a no-carve pumpkin?
A: No. No-carve pumpkins, whether real or foam, are not designed to hold a flame. Real painted pumpkins still have flammable flesh, and foam pumpkins are highly flammable. For illumination, use battery-operated LED tealights placed near or behind the pumpkin, never inside. This is a critical safety consideration for any Jack Skellington pumpkin display.
Q: What if I don't have a black permanent marker? Can I use black paint?
A: Absolutely! Black acrylic paint with a fine-tipped brush offers excellent control and a rich, opaque finish. It might take a bit more steady hand than a marker, but it can produce beautiful results, especially for intricate stitch lines.
Q: Can children participate in this activity?
A: Yes, wholeheartedly! No-carve pumpkin decorating is one of the safest and most enjoyable Halloween activities for children of all ages. Supervise younger children with paint, but the overall process is very kid-friendly.
Bringing Halloween Town Home
Creating your own no-carve Jack Skellington pumpkin is more than just a craft project; it's an invitation to bring a touch of Halloween Town's magic into your home. It’s a rewarding, mess-free activity that yields impressive results, whether you're a seasoned crafter or just starting out. You'll not only have a striking piece of decor but also the satisfaction of knowing you created it yourself, safely and easily. So gather your supplies, put on your favorite spooky soundtrack, and get ready to transform a humble pumpkin into the charming, ghoulish face of the Pumpkin King.