The iconic, ghoulishly charming face of Jack Skellington has graced countless Halloween celebrations since "The Nightmare Before Christmas" first captivated audiences. If you're looking to infuse your spooky season with a touch of whimsical macabre, transforming a humble pumpkin into the Pumpkin King himself using Printable Jack Skellington Pumpkin Stencils & Templates is an absolute must. Forget generic jack-o'-lanterns; this year, you're crafting a masterpiece that’s both impressive and surprisingly achievable, even if you’re new to the carving game.
This guide will walk you through everything you need to know, from finding the perfect stencil to the final, illuminated display, ensuring your Jack Skellington pumpkin is the talk of the neighborhood.
At a Glance: Your Jack Skellington Pumpkin Journey
- Discover the best printable stencils: Learn where to find free and paid templates, and how to choose one that matches your skill level.
- Gather your gear: Essential tools for a smooth, safe, and successful carving experience.
- Master the carving process: Step-by-step instructions from prepping your pumpkin to making those intricate cuts.
- Preserve your masterpiece: Tips to help your Jack Skellington pumpkin last longer.
- Elevate your display: Creative ideas for showcasing your finished work and troubleshooting common issues.
Why Jack Skellington? The Pumpkin King's Enduring Appeal
Jack Skellington isn't just a character; he's a Halloween icon. His tall, lanky frame, expressive skull face, and dapper pinstripe suit embody the perfect blend of spooky and sophisticated. What makes him so beloved for Halloween decor, especially pumpkins?
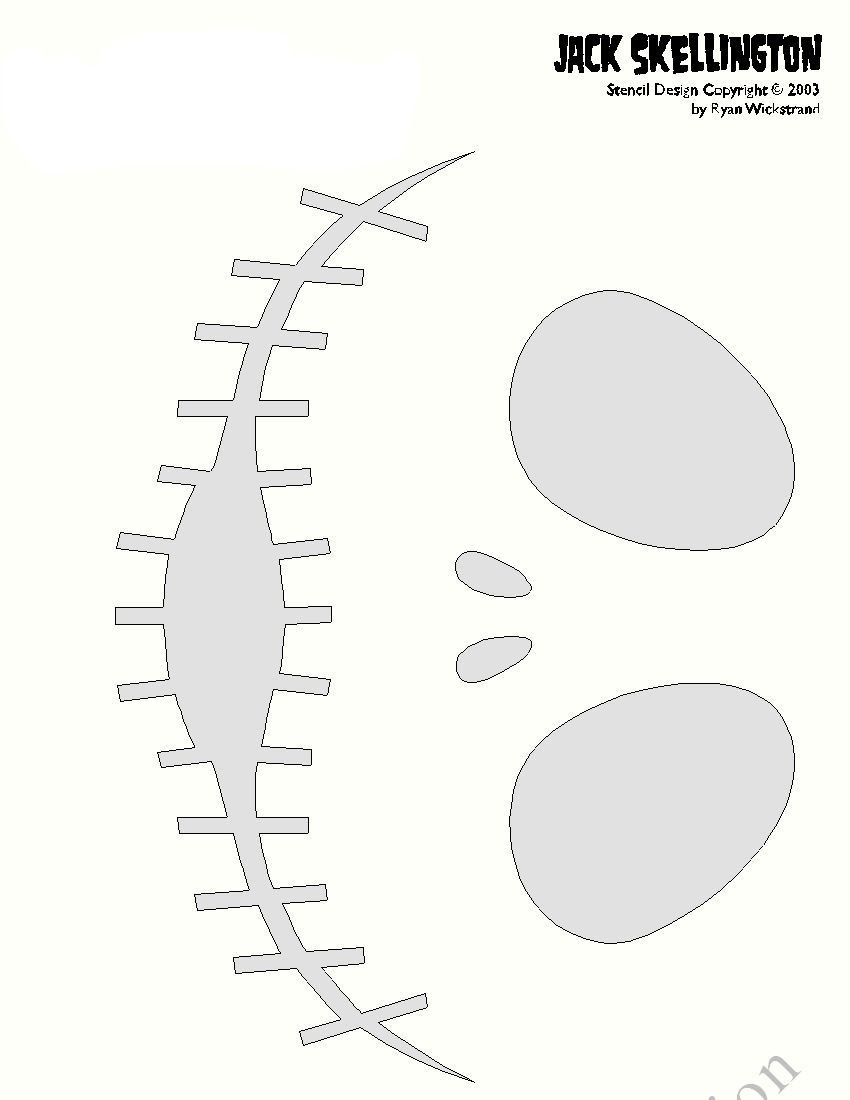
First, his distinct features—large, round eye sockets and a stitched grin—are remarkably well-suited for carving. They provide clear, strong lines that translate beautifully onto a pumpkin's curved surface. Second, "The Nightmare Before Christmas" has a multi-generational appeal, making Jack a universally recognized and adored symbol of the season. He evokes nostalgia for many adults and sparks wonder in children. Plus, he's the "Pumpkin King" for a reason! Decorating your home with a Jack Skellington pumpkin immediately signals a love for Halloween's darker, more imaginative side without being overly frightening. It's a whimsical nod to a classic tale, turning your humble gourd into a piece of pop culture art.
Finding Your Perfect Jack: A Guide to Printable Stencils
The first step to carving a phenomenal Jack Skellington pumpkin is selecting the right stencil. With a wealth of Printable Jack Skellington Pumpkin Stencils & Templates available online, knowing where to look and what to consider is key.
Where to Look for Stencils
- Fan Sites & Blogs: Many dedicated fan communities and Halloween blogs offer free stencils for personal use. A quick search for "free Jack Skellington pumpkin stencils" will yield numerous results. These often range from simple outlines to more detailed interpretations.
- Craft & Printable Websites: Sites specializing in printables or craft projects frequently host a selection of character stencils. Some may require a small fee or a subscription, but they often offer higher-quality, more intricate designs.
- Official Sources (Sometimes): Occasionally, official Disney or "Nightmare Before Christmas" promotional sites will release stencils, especially around the Halloween season. Keep an eye out for these for authentic designs.
Types of Jack Skellington Stencils
Not all Jack Skellington stencils are created equal. They generally fall into a few categories:
- Simple Outline Stencils: These are perfect for beginners. They typically feature just the main lines of Jack's eyes, nose, and mouth, meant for a straightforward carve-through.
- Detailed Stencils: These go beyond the basics, adding details like his brow lines, cheekbones, or even the stitches on his mouth. They require a bit more precision and patience.
- Shading/Scraping Stencils: For advanced carvers, these stencils indicate areas not just to cut through but to scrape away the pumpkin skin to different depths. This creates a multi-dimensional effect, allowing light to shine through varying opacities, giving your pumpkin a realistic, glowing depth. Think subtle gradients that make Jack's face truly come alive.
- Character Variations: You might find stencils featuring Jack in different expressions (happy, surprised, sinister), or even alongside Sally or Zero. Consider your desired mood for your pumpkin.
Choosing the Right Stencil for Your Skill Level
- Beginner: Stick to simple outline stencils. Fewer intricate cuts mean less frustration and a higher chance of success. Look for designs with large, open areas for the eyes and mouth.
- Intermediate: If you’ve carved a few pumpkins before, try a detailed stencil. You'll need an X-Acto knife or similar precision tool for the finer lines.
- Advanced: Tackle shading stencils. These demand specialized tools and a keen eye for depth, but the results are truly spectacular. This is where you can truly show off your carving prowess and bring nuanced expression to the Pumpkin King.
Pro Tip: Always print a test copy of your chosen stencil on plain paper first. This lets you check the size relative to your pumpkin and ensures all lines are clear. You can often resize the image using your printer settings or by pasting it into a document and adjusting its scale.
Gearing Up: Essential Tools for a Spooktacular Carve
Before you even think about putting a blade to your pumpkin, gathering the right tools is crucial. Good tools don't just make the job easier; they make it safer and yield better results.
The Pumpkin Itself: Your Canvas
- Size and Shape: Choose a pumpkin that's proportional to your chosen stencil. A larger stencil needs a larger pumpkin. Look for a relatively smooth, unblemished surface where Jack's face will go.
- Firmness: Press on the pumpkin skin. It should be firm, not soft or mushy anywhere. Soft spots indicate rot, which means your masterpiece won't last long.
- Flat Bottom: A pumpkin that sits stably on its own is always a good start.
Printing the Stencil
- Printer Paper: Standard printer paper (8.5x11 inches) works fine, but consider slightly heavier cardstock if you want the stencil to be more rigid for intricate designs.
- Tape: Masking tape, painter's tape, or even clear Scotch tape works well for securing the stencil to the pumpkin.
Carving Tools: From Basic to Pro
While a cheap supermarket carving kit can get the job done, investing in a few quality tools will significantly improve your experience and the final product.
- Basic Pumpkin Carving Kit: These typically include a small saw, a scoop, and a poking tool. They're good for general tasks.
- X-Acto Knife or Craft Knife: Absolutely essential for detailed stencils. Its sharp, fine blade allows for precision cuts that carving saws can't achieve. Always use a fresh blade for optimal results.
- Pottery or Clay Loop Tools: If you're attempting shading techniques, these tools are invaluable. They have small wire loops that are perfect for scraping away the pumpkin's outer layer to create varying light effects.
- Poking Tool/Awl/Thumbtack: Used to transfer the stencil design onto the pumpkin. A dedicated poking tool from a carving kit is great, but a simple thumbtack or a dull pencil point can work too.
- Spoon/Scoop: For removing seeds and pulp. A large, sturdy metal spoon (like an ice cream scoop) is often better than the flimsy ones in basic kits.
- Large Serrated Knife: For cutting the lid (adults only!).
- Damp Cloth or Paper Towels: For wiping away pumpkin guts and keeping your carving area clean.
- Bowl: For holding pumpkin guts and seeds.
Safety First!
Pumpkin carving can involve sharp tools, so safety is paramount.
- Adult Supervision: Children should always be supervised by an adult when carving. Better yet, have adults handle the sharp knives while kids do the scooping and tracing.
- Gloves: Consider wearing gloves, especially if you have sensitive skin or any cuts. Pumpkin juice can be irritating.
- Stable Surface: Work on a clean, dry, stable surface where your pumpkin won't roll.
- Cut Away From Yourself: Always direct the blade away from your body.
- Good Lighting: Ensure your workspace is well-lit so you can clearly see your lines and cuts.
Prepping Your Pumpkin: Laying the Foundation
A well-prepped pumpkin is half the battle won. This stage sets the stage for a clean, successful carve.
Cleaning the Exterior
Before anything else, give your pumpkin a good wash. Use a damp cloth to wipe away any dirt, mud, or debris from the surface. This ensures your stencil adheres properly and your carving tools don't get gunked up.
Cutting the Lid: Top or Bottom?
While the traditional method is to cut a lid from the top, many experienced carvers prefer cutting from the bottom.
- Top Cut (Traditional):
- Pros: Easy access for scooping, classic look.
- Cons: Can weaken the pumpkin stem, lid might fall in, unsightly cut line at the top.
- How-to: Using a large serrated knife (and adult supervision!), cut a zigzag or star pattern around the stem, angling the knife inward as you cut. This creates a ledge for the lid to rest on and prevents it from falling inside.
- Bottom Cut (Preferred by Pros):
- Pros: Keeps the top of the pumpkin intact for a cleaner look, makes it easier to place the pumpkin over a light source (especially electric ones), strengthens the stem.
- Cons: A little trickier to scoop.
- How-to: Place the pumpkin on a stable surface. With your serrated knife, cut a large, even circle on the bottom. Again, angle your knife inward slightly to create a ledge.
Scooping the Guts: Getting Clean
This is often the messiest but most satisfying part!
- Remove the Lid/Base: Carefully pry off your cut-out section.
- Initial Scoop: Use a sturdy spoon or ice cream scoop to remove all the seeds and stringy pulp. Don't be shy; get in there and scrape thoroughly.
- Separate Seeds: If you plan to roast pumpkin seeds, separate them into a bowl.
- Scrape the Walls: This is crucial. Using your scoop or a specially designed pumpkin scraper (often with a serrated edge), scrape the inside walls of the pumpkin until they are smooth and uniformly thin, ideally about ¾ to 1 inch thick. Thinner walls make carving easier and allow more light to shine through. Don't make them too thin, or the pumpkin might collapse.
Transferring Jack's Grin: From Paper to Pumpkin
This stage is about precision. A well-transferred stencil means a well-carved pumpkin.
Taping the Stencil
- Positioning: Place your printed Jack Skellington stencil on the smoothest part of your pumpkin where you want his face to be. Consider the pumpkin's natural curves.
- Secure with Tape: Use masking tape or painter's tape to secure the stencil firmly. Start at the center and work your way out, pressing the paper flat against the pumpkin.
- Making Relief Cuts: For curved pumpkins, the paper won't lie perfectly flat. Make small, shallow cuts (relief cuts) with scissors into the edges of the stencil paper, stopping just before the design lines. This allows the paper to overlap slightly and conform better to the pumpkin's shape without distorting the design. Use more tape to hold these overlapping sections down.
Poking the Outline
This is where you transfer the design without cutting.
- Tools: Grab your poking tool, awl, or thumbtack.
- Poke, Don't Pierce: Starting from one point on the design (e.g., the corner of an eye), begin poking small holes along all the stencil lines. Aim for holes that are about 1/8 to 1/4 inch apart.
- Consistent Depth: Try to make your holes consistently deep enough to go through the pumpkin skin, but not so deep that you're piercing far into the flesh.
- Accuracy is Key: Take your time and be as accurate as possible, especially around intricate details. These dots will be your carving guide.
- Remove the Stencil: Once you've poked every line of the design, carefully remove all the tape and peel off the paper stencil. You should see a clear outline of Jack's face in tiny dots.
Connecting the Dots (Optional)
Some carvers like to use a fine-tipped dry-erase marker or a light pencil to connect the dots before carving. This can provide a clearer visual guide, especially if your dots are faint or far apart. If using a marker, ensure it's dry-erase so it can be wiped off easily later.
The Art of the Carve: Bringing Jack to Life
Now for the main event! This is where Jack Skellington truly emerges. Patience and technique are your best friends here.
Carving Techniques: A Strategic Approach
- Start Small, Work Big: Always begin carving the smallest, most intricate details first. If you start with large sections, the pumpkin might become unstable, making the smaller cuts harder. For Jack, this means tackling the corners of his eyes or the individual stitches of his mouth before moving to the main shapes.
- Inside Out: When carving a shape, start from the inside edge of a line and carve towards the outside edge. This helps prevent jagged edges and keeps the pumpkin stable.
- Gentle Pressure: Don't force the tool. Let the sharpness of the blade do the work. Excessive force can lead to slips or cracks in the pumpkin.
- Sawing Motion: For the small carving saws, use a gentle back-and-forth sawing motion, not a straight push.
- Clean Cuts: Aim for clean, vertical cuts. If your knife is angled too much, the carved piece might not fall out cleanly or the edges will be rough.
Using Different Tools for Different Cuts
- Carving Saws: Best for larger, simpler outlines like the main perimeter of Jack's eyes and mouth. Use the sawing motion to follow your poked lines.
- X-Acto Knife/Craft Knife: Indispensable for fine details like the lines around Jack's eyebrows, the thin parts of his nose, or the individual stitches of his mouth. Hold it like a pen and use controlled, precise cuts. Change blades frequently if it starts to drag.
- Clay Loop Tools (for Shading): If your stencil includes shaded areas (marked to be scraped, not cut through), these are your go-to. Use them to carefully scrape away the pumpkin's outer skin to varying depths. The shallower the scrape, the less light will pass through, creating gradients. This takes practice but yields stunning results that mimic relief sculpture.
- To truly explore the nuances of bringing Jack Skellington to life through carving, and to delve into various techniques and inspiration, you might want to Explore Jack Skellington pumpkins from a broader perspective.
Dealing with Tricky Areas
- Tight Corners: For sharp turns, don't try to carve the entire curve in one go. Make several small, straight cuts that meet at angles. Then, you can gently clean up the edges.
- Thin "Bridges": If your design has thin sections of pumpkin holding larger carved areas together (like the bridge between Jack's eyes), carve around them very carefully. These are the weakest points and prone to breaking. Support the pumpkin flesh as you cut.
- Removing Carved Pieces: Once a section is completely cut, don't force it out. Gently push it from the inside of the pumpkin. If it's stubborn, check for any missed connection points with your carving tool. A toothpick can also help dislodge small pieces.
A Note on "Shading" Carving
This technique elevates your pumpkin from a simple cutout to a glowing piece of art. Instead of cutting all the way through, you're removing layers of the pumpkin's skin and flesh to create areas of translucency.
- Outline First: Begin by outlining the "shaded" areas with a very shallow cut from your X-Acto knife or the fine tip of a clay tool.
- Scrape Gradually: Use your clay loop tools (or even a sturdy spoon for larger areas) to scrape away the pumpkin flesh within those outlines. Start with light pressure and gradually deepen the scrape in certain areas, observing how the light begins to show through.
- Backlighting is Key: Periodically turn off your room lights and shine a flashlight from inside the pumpkin to check your progress. This will show you exactly how light is passing through and where you need to scrape more or less. Aim for a smooth transition between scraped depths.
Finishing Touches and Preservation: Make Jack Last
You've put in all that hard work; now ensure your Jack Skellington pumpkin looks great and lasts as long as possible.
Cleaning Up the Cuts
- Smooth Edges: After all carving is done, use a toothpick, a small brush, or even a damp Q-tip to gently remove any loose pumpkin fibers or stringy bits clinging to the edges of your cuts. This makes for a much cleaner, sharper appearance.
- Wipe Down: Use a damp cloth to carefully wipe away any marker lines (if you used them), stray pulp, or dirt from the exterior of the carved design.
Preservation Methods: Extending Jack's Lifespan
Carved pumpkins are perishable. Here are a few ways to keep your Jack Skellington looking fresh for longer:
- Petroleum Jelly: This is a classic method. After carving and cleaning, apply a thin layer of petroleum jelly (like Vaseline) to all the cut edges, both inside and out. This seals in moisture and prevents dehydration, which is the primary cause of shriveling and molding.
- Bleach Soak/Spray:
- Soak: For maximum preservation, submerge your carved pumpkin in a bucket of water with 1 tablespoon of bleach per gallon of water for several hours (or overnight). The bleach kills mold and bacteria.
- Spray: Alternatively, fill a spray bottle with a solution of 1 teaspoon of bleach per quart of water. Mist the inside and all cut surfaces of your pumpkin daily.
- Commercial Pumpkin Preserver: Many craft stores sell sprays specifically designed to preserve carved pumpkins. Follow the product instructions.
- Refrigeration: If space allows, storing your pumpkin in a cool, dark place or even in the refrigerator when not on display can significantly extend its life.
- Avoid Direct Sunlight & Heat: Place your pumpkin in a shaded area, away from direct sunlight, heating vents, or overly warm spots, which will accelerate decay.
Lighting Your Masterpiece: Candles vs. LEDs
The right light source will make Jack truly shine.
- Traditional Candles:
- Pros: Authentic, warm, flickering glow.
- Cons: Fire hazard, heat can dry out the pumpkin, soot build-up, short battery life. Use votive candles or tea lights placed in a sturdy holder.
- LED Battery-Operated Lights:
- Pros: Safe (no fire risk), no heat (less drying), long battery life, often come with timers or color-changing options.
- Cons: Can sometimes look less "authentic" than a real flame.
- Options: Flameless LED candles, puck lights, or even strings of fairy lights can create a fantastic effect. Place them strategically inside for even illumination.
Beyond the Carve: Creative Variations
What if carving isn't your forte, or you want a longer-lasting Jack?
Painting Jack Skellington Pumpkins
If sharp tools aren't your jam, or you need a pumpkin that lasts all season (or beyond!), painting is a fantastic alternative.
- Pumpkin Choice: Real or craft foam pumpkins both work great.
- Base Coat: Paint the entire pumpkin white with acrylic or spray paint. Let it dry completely.
- Stencil or Freehand: Use a printable Jack Skellington stencil by tracing it lightly with a pencil, or freehand paint his features directly onto the white surface using black acrylic paint.
- Details: Use a fine brush for his eyes, nose, and stitches. You can add more dimension by lightly shading with grey.
- Sealant: Finish with a clear sealant spray to protect your artwork.
Foam Pumpkins: The Reusable Option
For a truly permanent Jack Skellington, invest in a craft foam pumpkin. These lightweight, durable pumpkins can be carved or painted year after year. The carving process is similar, though you'll use different tools (a craft knife or foam carving tools) and won't need to scoop guts!
Adding Accessories
Once Jack's face is complete, consider adding a few thematic accessories:
- Santa Hat: A small Santa hat can transform him into Sandy Claws.
- Bow Tie: A fabric or paper bat bow tie can give him his signature look.
- Zero: A small painted or 3D Zero figure nearby makes for a delightful duo.
Troubleshooting Common Carving Woes
Even experienced carvers run into issues. Here's how to tackle some common problems:
- Pumpkin Cracking: If you cut too deep, or the pumpkin is old, cracks can appear.
- Fix: For small cracks, apply a thin layer of petroleum jelly to seal them. For larger cracks, you might need to support the area from the inside with tape or a skewer, or accept it as part of the pumpkin's "character."
- Torn Stencil: If your paper stencil tears during transfer.
- Fix: Carefully realign the torn pieces and re-tape. If the tear is in a crucial design area, you might need to print a fresh copy and re-tape.
- Dull Tools: Carving becomes frustrating and dangerous with dull tools.
- Fix: Always use sharp tools. If using an X-Acto knife, replace the blade. For carving saws, some kits offer replacement blades.
- Uneven Cuts: Jagged edges or cuts that don't go all the way through.
- Fix: Go back over the uneven areas with a sharp, fine-tipped tool. For areas that didn't cut through, gently push from the inside to see where the resistance is, then carefully recut that spot.
- Pumpkin Drying Out: Shriveled or soft spots.
- Fix: Reapply petroleum jelly to cuts, or give it a refreshing soak in a bleach-water solution (as described in preservation).
Showcasing Your Pumpkin King: Display & Photography Tips
Your hard work deserves to be seen! Make sure your Jack Skellington pumpkin gets the spotlight it deserves.
Safe Display Locations
- Elevated Surfaces: Place your pumpkin on a sturdy, elevated surface like a porch railing, a sturdy table, or a bale of hay to make it more visible.
- Protected Areas: If using real candles, ensure it’s away from flammable materials and out of reach of pets and small children. A covered porch will protect it from rain, which can accelerate decay.
- Groupings: Create a "Nightmare Before Christmas" scene by grouping Jack with other themed pumpkins, props, or even a Sally doll.
- Windows: Placing your carved Jack in a prominent window can offer a spooky silhouette for passersby.
Capturing the Perfect Photo
Don't let your artistic efforts go undocumented!
- Night Shots: The true magic of a carved pumpkin comes alive at night. Take photos in low light, focusing on the glowing face.
- Tripod: For sharp night photos, use a tripod or prop your phone/camera on a stable surface.
- Experiment with Light: Try different light sources (bright LED vs. flickering candle) to see how they impact the mood of the photo.
- Angle: Get down to pumpkin level, or shoot from slightly above, to capture Jack's expression.
- Background: Choose a clean, uncluttered background that doesn't distract from your pumpkin.
Sharing Your Creation
Once you've captured that perfect shot, share your masterpiece! Post it on social media, tag your friends, or even enter local pumpkin carving contests. Inspire others to get creative with their Halloween decorations. Seeing your Jack Skellington pumpkin come to life is a point of pride, and sharing that joy is part of the fun of the season.
Family Fun & Lasting Memories: A Halloween Tradition
Carving a Jack Skellington pumpkin using Printable Jack Skellington Pumpkin Stencils & Templates isn't just about the final product; it's about the experience. It's a fantastic family activity that brings everyone together for some hands-on Halloween fun. Kids can help with scooping the guts, taping stencils, or even supervising the adult carvers! It’s an opportunity to create lasting memories, foster creativity, and build anticipation for the spooky season. Imagine turning it into an annual tradition, each year striving for a more elaborate or whimsical Jack.
Ready to Transform Your Halloween? Your Next Steps
You now have a comprehensive guide to crafting a spectacular Jack Skellington pumpkin. From selecting your perfect stencil to the precise art of carving and thoughtful preservation, you're equipped with the knowledge to make this Halloween unforgettable.
So, what are you waiting for? Head online to find your favorite Printable Jack Skellington Pumpkin Stencils & Templates, gather your tools, pick out the perfect pumpkin, and get ready to unleash the Pumpkin King's iconic grin on your doorstep. Your neighbors—and your inner "Nightmare Before Christmas" fan—will thank you!